Installing Debian 11 on Lenovo IX2 and Other Kirkwood NAS Devices
Written by Geoff Mottram (geoff at minaret dot biz).
Placed in the public domain by the author.
Last updated: July 2, 2022
This document and all associated software is provided "as is", without warranty of any kind, express or implied, including but not limited to the warranties of merchantability, fitness for a particular purpose and noninfringement. In no event shall the author be liable for any claim, damages or other liability, whether in an action of contract, tort or otherwise, arising from, out of or in connection with this document and associated software or the use or other dealings in same.
Contents
- Introduction
- Checksums
- Lenovo IX2
- Debian Kirkwood
- How the IX2 Debian Kernel Boots
- Installing Raw Disk Images
- Running the "install.sh" Script
- Modify Your IX2 U-Boot Environment
- List of Files in the Tools Directory
- LEDs, Sensors and Fan Control
- How to Build the Kernel
- IX2 Documents, Specifications and Datasheets
- Maximum Disk Size
Introduction
This document was originally written to provide some tips on getting the most out of a Lenovo IX2 networked attached storage (NAS) device. Brand new devices are being sold as overstock and can be purchased very cheaply (see Parrallel Miner, for example).
A very early inspiration and helpful source of information, including the IX2 serial console pin-outs, was found here:
installing-arch-linux-arm-on-an-iomega-ix2-200
Ultimately, I stumbled upon a remarkable person who has ported the lastest Debian Bullseye (version 11) O/S to the family of Kirkwood processor motherboards, which include the IX2. This port is incredibly well done and runs flawlessly. Because Debian continues to support the ARM5 processor (Linux armel), their entire package tree is available for installation via "apt".
I ended up writing some installation scripts and documenting a procedure for booting the IX2 from a USB stick or IDE drive. Most of the scripts should work for any Kirkwood processor supported by the Kirkwood kernel but they have only been tried on the IX2-ng. Links for all materials are provided below.
Checksums
MD5 and SHA256 checksums for all .bz2 and .xz files on this site are provided here. You absolutely must validate your downloads.
MD5:

cc96ade21ea3e17e9d4636f4737fc935  ix2_dl_ide.img.xz
b558bba3cdfec46639165322ca345b50  ix2_dl_usb.img.xz
4fe192779dc816fc92f489c68781ad51  ix2_ng_ide.img.xz
af85b29a580101a1fb81b910ceb8c3d4  ix2_ng_usb.img.xz
dcbf015a899a10074c34dddee21dda49  kirkwood-5.18.7-ix2.tar.xz
ebc3c80cffb0c9852451ebf2865af930  kirkwood-5.18.7-dts.tar.bz2
b0679b6efa06b72ad828a8275306068a  kirkwood-5.18.7.patch.bz2
43b6ce36048671ca94eb1246537e019d  kirkwood-5.18.7.spi-nor.tar.bz2
f88563444e81b060a54a236f38d4bf0a  kirkwood-headers-5.18.7.tar.bz2
d132351c3619c0adb9e319466e6af849  tools-1.0.tar.bz2

SHA256:

f8df54bedb6feefc8eb3776003f2fe0f836d88a57c9e8a18dbf79dc2427d991f  ix2_dl_ide.img.xz
52bf1e2c9160c8a465a5e61c9df2c3460ecd16746bc70565a45a75a955dde0c5  ix2_dl_usb.img.xz
79b947f9ccad98d673c0d861ebe4625b7b108594765c8d389f943895f8ee9f6f  ix2_ng_ide.img.xz
45beeafd2bf1d3197e2af13235e22ae2777c790d0cd2585dac74461ff5fcc12e  ix2_ng_usb.img.xz
6be64bea8594378325220081e9d97a5d92967fb0fac5dc0a23457fce0235e382  kirkwood-5.18.7-ix2.tar.xz
a36a238ae164e46b4bc9d4339bc3e03e115f9a58ff82b023ac6e1a79001e6851  kirkwood-5.18.7-dts.tar.bz2
e576fc9315a022fb562badd0524d047d3ad295429d20b432094341d7b4ff9f65  kirkwood-5.18.7.patch.bz2
dd80b3397fe0541a0701228cd4684e4cd0a21aa7b7cbdc767f575c4dfb483bb8  kirkwood-5.18.7.spi-nor.tar.bz2
36713f3c5162129309ae04bf0cd2aa305206aea89eb0a51497b78171a007f7bf  kirkwood-headers-5.18.7.tar.bz2
70288e5540f9b8e16297e876e3fd2e26c1526d1fb0a11b19151591361ea3ec8b  tools-1.0.tar.bz2
Lenovo IX2
The hardware and software of the IX2 is really well engineered. The software that comes with the IX2 has a web interface that is powerful and easy to use. The kernel has a date from 2019 and according to "/etc/apt/sources.list", the O/S is based on Debian 7 (Wheezy).
Using SSH with the Stock Software
Enabling ssh for your IX2 is highly recommended. First determine what IP address has been assigned by to your IX2 by your router. This can be done using your router's web interface and looking at the DHCP leases for your IX2 box. It will have a host name of "ix2". Your life will be simpler if you can configure your router to always assign the same IP address to your IX2 (this is typically called a "static lease"). If you are using Linux on your desktop, you can then add an entry to "/etc/hosts" with the name ("ix2") and IP address of your IX2 so that you will be able to just type "ssh ix2".
Once you know the IP address of your IX2, go to the following URL in your web browser (IP_ADDRESS is the address of your IX2):
http://IP_ADDRESS/manage/diagnostics.htmlCheck the box that says "Allow remote access...", leave the port number at 22 (the default ssh port) and type in a root password. When you are finished click on the "Apply" button.
Once you have enabled ssh support, the main IX2 management page will display a warning that "Support access is currently enabled".
You can now ssh to the IX2 using the following Linux command:
ssh root@IP_ADDRESSIf you added your IX2 to /etc/hosts, you could do this instead:
ssh root@ix2VERY IMPORTANT: when you ssh to the IX2, you must add "soho" to the front of the password you typed into the diagnostics page. For example, if you used "1234" as the password on the diagnostics page, you will actually log in via ssh using "soho1234".
Removing a Hard Drive when using the Stock Software
The stock software that came with my IX2 devices configured the two hard drives in "linear" RAID mode. This combines the two drives into one larger drive without providing any RAID duplication. Unless you are using all of that space, you may not want two hard disks running all of the time. I didn't.
Remember: whether you use RAID or not, you still have to run backups regularly, because sometimes, things just break or get damaged.
The high-level procedure for running on one drive is as follows:
- Reconfigure the IX2 to use RAID1.
- Remove the second hard drive.
- Turn off the "red" LED.
If you do want to run RAID-1, don't pull the second drive after you have enabled RAID-1.
VERY IMPORTANT: When you use the IX2 software to switch between LINEAR and RAID-1 or vice versa, all user data is erased. This is all of the content in the various shares. You MUST backup this data before you proceed. The easiest way to do this is to plug a USB drive into the USB port on the IX2, ssh into the iX2 and backup everything in the /nfs directory to the USB drive. Alternately, use "rsync" to backup to another machine/device on your network.
The steps for enabling RAID-1 (IP_ADDRESS is the address of your IX2):
- Backup your "/nfs" data to an external drive.
- Go to the management screen at "http://IP_ADDRESS/manage/manage.html".
- Click on the "All Features" tab.
- Click on the "Configuration Backup and Restore" icon.
- Click on "Back up configuration". This will collect all of your settings and send them to your web browser. Save this file.
- Click on the "Drive Management" icon. The "Protection" field should say "none" or "linear". It will not say "Mirror (RAID1)".
- Click on the "Settings" icon.
- On the "Protection" drop-down list, select "Mirror (RAID1)", leave "Disk Write Caching" as "Always disabled" and click on the "Apply" button.
- You will be warned about losing all of your data. If you are OK with that, click "OK" and start the conversion process.
- The conversion will take a few hours. You can watch the progress via ssh by typing "cat /proc/mdstat" repeatedly. The drive management screen will show some graphics to indicate that the system is reconfiguring. You must wait until the conversion is complete before you can continue.
Once the conversion is complete:
- Go to the management screen.
- Click on the "Configuration Backup and Restore" icon.
- Click on "Restore configuration". You will be prompted for a configuration file to upload from your local machine. Use the configuration file you saved earlier. This will recreate the original share folders but they will be empty.
- Restore your share data from the external disk used earlier. Even if you didn't have any files yourself, the IX2 includes a handful of example files that should be restored so the system looks the same as before.
If you want a RAID-1 setup, you are finished. Otherwise:
- Use the management interface to shutdown the IX2 (the power icon on the main page).
- Remove drive 2.
- Restart the IX2. The white "power" LED will be red and the system will complain that your data is "at risk". The fix for the red LED is given in the next section.
At the time of this writing, I have been running my IX2 with the stock software and one drive for a couple of months as a NFS server for VMware vCenter without any issues. It runs cooler, quieter and uses less electricity. Nonetheless, you must be comfortable with your own choices.
Playing with the LEDs when using the Stock Software
You need to "ssh" to the IX2 to play with the LEDs.
The LEDs on the stock software are controlled by using the "echo" command to set a value to one of the files in the directory "/sys/class/nasled". The following LED devices are found here:
    hdd1_link
    hdd1_red_led
    hdd2_red_led
    led_blinkrate
    led_brightness
    pwr_white_led
    system_red_led
Use "echo NUM > /sys/class/nasled/LED_FILE" with the following values. IMPORTANT: make sure there is a space after NUM and before the greater-than sign.
    system_red_led and pwr_white_led values:

        0 - off
        1 - on
        2 - blink

    led_brightness supports the following values:

        0 - low
        1 - med
        2 - high

    led_blinkrate values:

        0 - fast
        1 - med
        2 - slow
If you remove your second hard disk, the IX2 management page will complain that "Storage is degraded and data protection is at risk". The system will also turn on a blinking red LED. To turn off this light, add the following lines to the bottom of "/etc/rc.local" but before the "exit 0" line (that line is very important and must be the last line in the file).
    LED_DIR=/sys/class/nasled
    echo 0 > $LED_DIR/system_red_led
    echo 1 > $LED_DIR/pwr_white_led
    echo 2 > $LED_DIR/led_blinkrate
These commands turn off the red LED, turn on the white LED and sets the blink rate to a slower value. Be very careful that there is a space between the digit and the greater-than sign or put quotes around the digits.
Connecting to the Console
If you are so inclined, there is no subsitute for being able to connect to the IX2 console during boot. This is not an absolute requirement and the directions for installing Debian allow you to do the installation either way. However, if things go wrong and the system won't boot, you will have to attach a serial cable to see what the problem is.
In order to connect to the console you need a 3.3V serial USB cable, such as the following:
FTDI Serial Cable
Photo of front of IX2 with serial cable in use. You won't be able to attach the front bezel but by threading the cord through one of the holes in the front, you won't interfere with either drive bay.
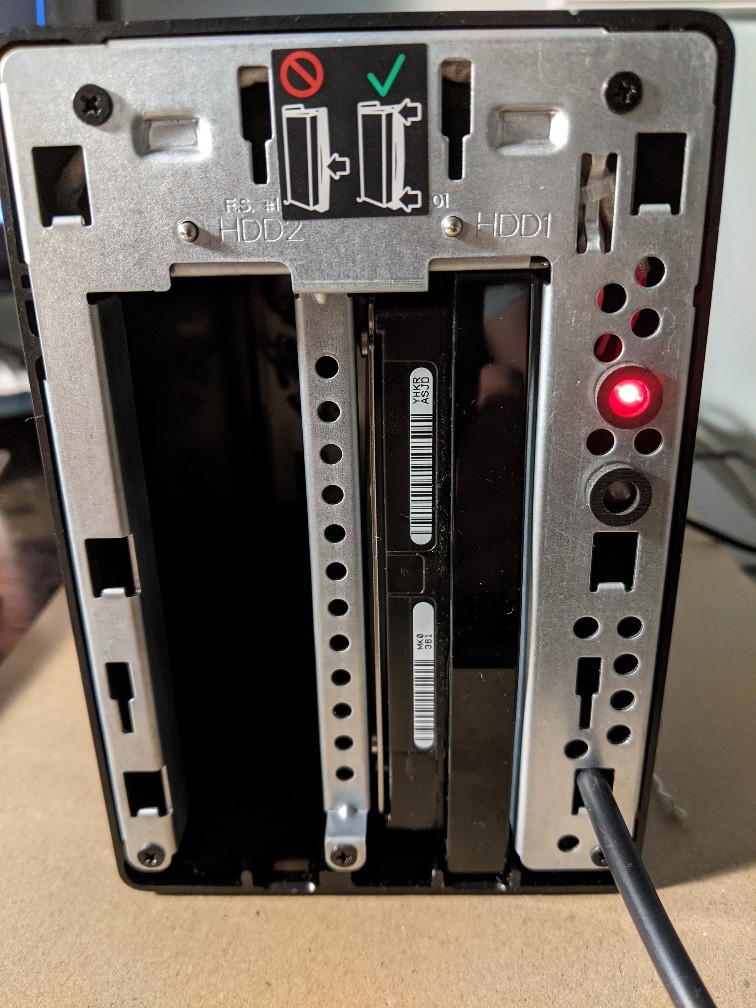
Photo of back of device with after removing the rear bezel (four corner screws). The arrows indicate which two screws to remove so you can slide the innards out of the housing.
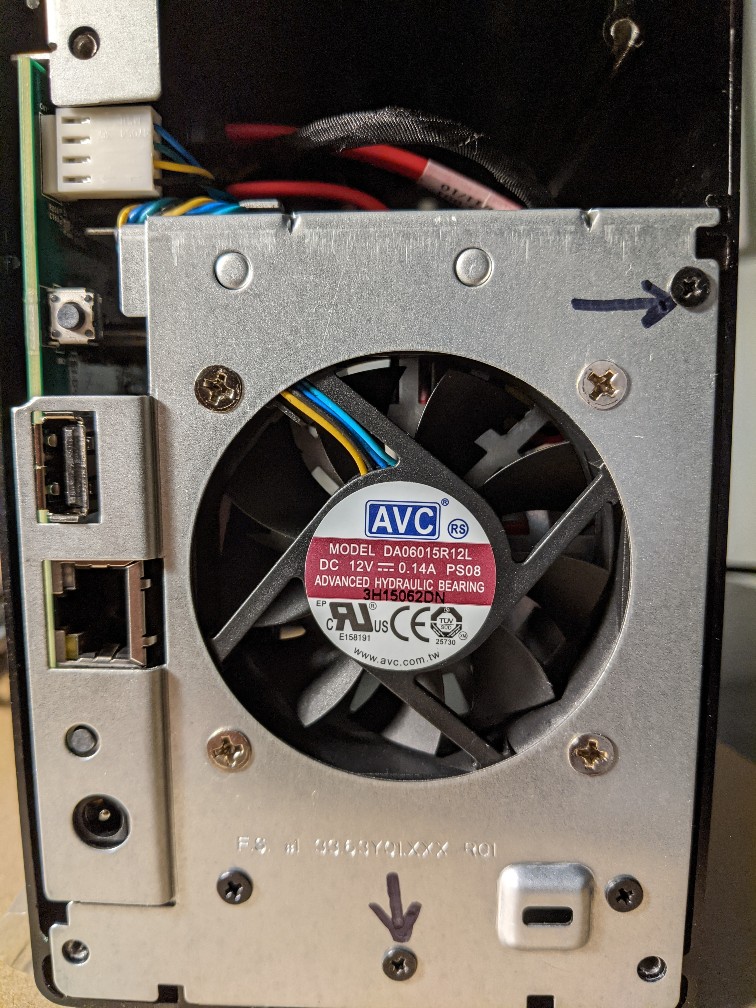
Photo of FTDI cable attached to the motherboard console connection.

Important: The IX2 must be powered down before you attach a console cable.
If you are extremely dextrous you may be able to attach the wires after removing the front bezel and disks. Otherwise:
- Disconnect all wires and plugs from the back of the box.
- Remove all disks from the front of the box.
- Remove the four screws holding the back bezel in place and remove the back.
- Remove the following two black screws from the exposed silver back plane:
- One near the bottom, just right of center and
- The other in the top right corner.
- Carefully jiggle the fan enclosure and motherboard assembly out of the back. There is a cable from the front LEDs to the motherboard that is just long enough that you don't have to disconnect this cable to attach the serial cable.
There is a four pin connector on the IX2 motherboard with the pins pointing towards the front of the cabinet. When looking at the connector with the motherboard in the vertical (normal) orientation, the pins are, from top to bottom: 3.3 V power (do not use), transmit, ground and receive. When connecting them to the USB cable, the trasmit pin on the board is attached to the receive wire of the USB cord and vice versa. For the FTDI cable, the three colors are (from top to bottom): yellow, black and orange.
After you have attached the cable, do not reassemble the system until you have tested the connection to your computer. A popular Linux program to use as a terminal emulator with the cable is "minicom". You will have to configure your Linux system to associate the USB port with a character device (like "/dev/ttyUSB0"). For instructions, run an internet search along the lines of "linux assign usb port to serial cable". Here are two such pages:
fir3net.com
selevel.com
The following Minicom settings are used to connect to the IX2 console:
    Bits Per Second: 115200 8N1
    Hardware Flow Control: No
    Software Flow Control: Yes
With the cable connected and minicom running, turn on the power to the IX2 (without any drives or USB stick). You should see the "Marvell" U-Boot splash screen. If you see nothing but junk characters, you either don't have minicom configured correctly or you may have the Transmit and Receive wires reversed. Remember to power down before modifying your cable connections.
Debian Kirkwood
The most heartfelt thanks goes out to everyone who has contributed to Linux, U-Boot, Debian, device trees, documentation and help pages. This is particularly true for the legion of Kirkwood fans who keep this product line alive. The IX2 is just one product that is based on this architecture.
Extra kudos go out to Bodhi who continues to maintain and patiently support a kernel and Debian distribution that seems to run just about every Kirkwood motherboard. The following page provides the Debian 11 (Bullseye) kernel, base system and directions:
Debian 11 for Kirkwood
Once you have this system running on your IX2, you can use the "apt" system to install addition packages because, thankfully, Debian still supports the "armel" 32 bit ARM architecture. You must first install the files listed in the "26 Sept 2021" post and once you have that running, install the files at the top of the page to replace the kernel with the latest version.
To save others time, I have installed the above files, made a few updates and provided the final O/S as a tar file you can download and install. Alternately, there are IX2 raw disk images. There is also an installation script that will prepare a USB stick or IDE drive with the O/S. See Prepackaged Solution below.
Root Password
The Debian systems you can download from Bodhi and from here have a "root" account with a password of "root". Please change it as soon as you get something running.
Also note that the first time you boot one of these systems, they will generate new host SSL certificates which may take a few moments.
SPI-NOR
The SPI-NOR device driver in the latest Linux kernels do not completely work with the IX2-ng (which uses SPI NOR flash RAM). The command "fw_printenv" works fine but the command "fw_setenv" does not. This is because the device driver will not unlock and lock the areas of flash used by the U-Boot environment. The IX2-dl uses NAND flash and a different device driver, so it may be fine (I don't have a IX2-dl to test).
If you have a serial console cable, you can make all of your U-Boot environment changes in U-Boot directly. In general, you will not need to keep changing your environment unless the size of the kernel or initial ram disk outgrows the area reserved for it on the hard disk (more on U-Boot environment variables below).
The first work-around if "fw_setenv" is not working is to ignore the problem since you may never have to update your U-Boot environment. The second work-around is to use a serial cable any time you want to change the U-Boot environment.
The third work-around requires access to U-Boot via a console cable, but only once. When U-Boot starts, press ENTER to stop the booting process and type the following command:
protect off allThis will remove all protection from the flash RAM until the next time you use the U-Boot "setenv" command. It will allow you to use the stock "fw_setenv" because this command will see that the flash is not locked and will not try to unlock it before or lock it after making its changes. I really don't know how safe this is, so use this solution at your own risk.
Finally, there is a "fix" which is installed in the "Prepackaged Solution" and which you can install separately if you want to compile your own kernel by using the updated source code files available here:
kirkwood-5.18.7.spi-nor.tar.bz2
For the fix, two new flags have been defined in "drivers/mtd/spi-nor/core.h":
SPI_NOR_ALL_LOCK
When this flag is set, the driver will treat any unlock or lock request as a request for the whole of flash.
SPI_NOR_8BIT_SR
The default size of the status register in the "spi-nor.c" device driver was changed to 16 bits in the Linux kernel. This code is used by the "macronix.c" specification file but many of those chips have 8 bit status registers. The work-around here is to define a new flag which can be set on any devices which have an 8 bit status register.
In addition, a new DTS property has been defined called "all-lock". This is used in the flash section of the DTS and is a boolean. This way, either the SPI_NOR_ALL_LOCK flag can be set in the device driver for all implementations of a given chip or it can be set on a board-by-board basis in the DTS files. For the IX2-ng, the change was made to the DTS file so as not impact other systems which may not have the locking issue.
FYI, the SPI-Flash chip in the IX2-ng is the MX25L8008E. See below for the datasheet.
Before You Begin
This section is specific to the IX2 but should be useful for anyone with an older version of U-Boot that needs a little extra TLC to run a modern Linux kernel.
The U-Boot bootloader that is installed in the FLASH RAM of the IX2 is quite old and lacks a lot of the niceties that have been added to U-Boot over the years. In Bodhi's post (link above), any time the instructions split for those with a newer U-Boot and those with a "stock U-Boot", the IX2 is in the latter camp. In addition, you must pass certain command line arguments to the kernel that describe your configuration.
The Linux kernel uses something called a "device tree" which is a hierarchical data structure which describes the hardware being used by the operating system. If you unpack the Kirkwood kernel files and look in the "boot/dts" directory, you will find all of the Kirkwood systems that are supported by this kernel. These are the binary versions of these files. The original ".dts" files come from two places: the Linux kernel GitHub page and with patches and additions made by Bodhi. The patch file can be extracted from the following Bodhi tar file:
linux-5.18.6-kirkwood-tld-1-bodhi.tar.bz2The patch file is called:
linux-5.18.6-kirkwood-tld-1.patchThis is where you will find the source DTS definitions for the "lenovo-ix2-dl" and "lenovo-ix2-ng".
As a convenience, the uncompiled DTS files for all supported Kirkwood devices are available in this tar file:
kirkwood-5.18.7-dts.tar.bz2
There are two versions of the Lenovo IX2 floating around: a diskless version (ix2-dl) which has 1GB of NAND flash memory which contains the IX2 operating system and a more basic version (ix2-ng) with 1MB of SPI flash memory that requires a hard disk to boot the OS from. The device trees for these two version are known as "kirkwood-lenovo-ix2-dl.dtb" and "kirkwood-lenovo-ix2-ng.dtb", respectively.
Before a Bohdi kernel can be installed on an IX2, it must be prepared so that the correct device tree file is appended to the kernel. Newer versions of U-Boot do not require this step.
IX2 Issues
All of the issues I have had with the IX2 have been U-Boot related. Once you can cross that hurdle, the Bohdi Debian Kirkwood kernel runs like a charm. Keep in mind the following with regards the IX2 U-Boot implementation (this just affects you during booting):
- It does not know how to read a GUID Partition Table (only fdisk).
- USB support is pretty fragile when the USB device does not respond quickly enough.
- You can boot from a quality USB stick (like PNY or SanDisk) but avoid cheap or free sticks.
- You can boot from an external USB drive, provided the drive is already spinning when you boot.
- You can probably boot from an external USB drive that is a solid state device (no spin-up required).
- You can often expect problems if reboot your kernel and you have a USB hard drive or solid state drive in the USB port.
- You can usually reboot with a USB stick in the USB port.
- Powering down the device and then pressing the power button gets around the reboot issues.
Determine Your Configuration
A running stock IX2 system is the easiest way to proceed. Use "ssh" to connect to the device and run "fw_printenv > ix2_env.txt". Then copy this file to your desktop (Linux "scp" is your friend here). Also copy the file "/etc/fw_env.config" to your desktop. This contains the configuration of your flash RAM and is used by "fw_printenv" and "fw_setenv".
If you don't have a running stock IX2 system and you don't know whether you have a disk-based (ng) or disk-less (dl) version of the IX2, connect a serial cable to your device and use the U-Boot "printenv" command.
The disk-based (ng) version of the IX2 has the following environment variable:
bootargs_mtd=mtdparts=spi_flash:0x7e000@0(u-boot),0x1000@0x7f000(env),0x1000@0x7e000(env2)
This is how you know that you have the 1MB SPI flash version of the IX2 (the "ng").
The disk-less (dl) version of the IX2 has the following environment variable:
	mk_mtdparts=setenv mtdparts mtdparts=nand_mtd:0x80000@0(uboot),0x20000@0xa0000(env),
	0x20000@0xc0000(env2),0x300000@0x100000(uImage),0x300000@0x400000(initrd),
	0x3f800000@0x800000(boot),1024m@0x0(flash)
This is how you know that you have the 1GB NAND flash version of the IX2 (the "dl").
Prepackaged Solution
To reduce duplication of effort, I have packaged up the latest kernel, initial RAM disk and root file system, and made the following changes:
- Added installation scripts (see list of tools below).
- Added a U-Boot environment installation script (see "ix2_env.sh" in list of tools below).
- Added support for dual USB/IDE booting (aka. rescue disk/live CD).
- Added a swap parition and updated /etc/fstab, accordingly.
- Enabled Network Time Protocol (NTP) because the IX2 has a real time clock.
- Updated "/etc/apt/sources.list" to include correct security URL.
- Installed root certificates ("apt install ca-certificates").
- Installed "parted" which supports GUID Partition Tables.
- Installed "fw_printenv" and "fw_setenv" to display and set the U-Boot environment.
- Installed "lm-sensors" for the "sensors" program which displays temperature sensors and fan output.
- Modified "/etc/initramfs-tools/initramfs.conf" to add "ext?" fsck and turn off the RESUME feature.
- Fixed SPI-NOR device driver so "fw_setenv" works on the ix2-ng.
- Edited /etc/fw_env.config (which describes the flash memory layout).
- Edited /etc/rc.local to call /etc/rc.ix2 to alter LEDs and fan control.
The result is a root file system with the latest kernel in the following compressed tar file:
kirkwood-5.18.7-ix2.tar.xz
The tar ball includes the directory "kirkwood-5.18.7-ix2/boot/tools" which is where the installation scripts are stored.
Alternately, if you just want the installation scripts, they are available here:
tools-1.0.tar.bz2
This tar ball includes the directory "boot/tools" which is where the installation scripts need to run from within your Kirkwood root file system. There is also a "boot/tools/custom" directory with the original and modified versions of the system files.
Here is the patch file used to create this kernel:
kirkwood-5.18.7.patch.bz2
Here are the headers for this kernel:
kirkwood-headers-5.18.7.tar.bz2
Here are the modified SPI-NOR files if you need them separately from the kernel patch file, above:
kirkwood-5.18.7.spi-nor.tar.bz2
Here are the uncompiled DTS files for all supported Kirkwood devices:
kirkwood-5.18.7-dts.tar.bz2
Finally, there are raw disk images for the IX2-dl and IX2-ng. These can be copied directly to a hard drive or USB stick. They contain a partition table and two paritions: swap and root. The expanded size of the raw disk image is 2 GiB. They can then be expanded to fill the entire device they are copied to. See below.
How the IX2 Debian Kernel Boots
The remainder of this document describes an installation with the following characteristics:
- U-Boot is modified to try booting from a USB stick and if that fails, to try IDE Disk1 and then Disk2.
- A swap partition is used to increase virtual memory.
- The names of the root and swap partitions are different for the IDE disk based kernel (rootfs+swap) than for the USB stick kernel (usbroot+usbswap). This allows the two kernels to coexist and for the USB stick to be used as a rescue / Live CD device.
The "stock" version of U-Boot installed on the IX2 supports the older "fdisk" style partition table and ext2 file systems. It can boot from a USB drive, IDE drive and flash memory. The "fdisk" partition table can only support drives of up to 2 TB in size. Larger disks require the use of a GUID Partition Table (GPT). The stock IX2 software uses a GPT partition table even though the IX2 U-Boot program does not know how to read them.
The solution used by the IX2 and also used here is to leave space at the beginning of the hard disk that is unallocated. In other words, the first partition is created 33 MiB from the start of the disk. This space is used to store the kernel and the initial RAM disk.
U-Boot Environment Variables
This solution for older U-Boot versions requires that the U-Boot environment variables be configured according to the size of the kernel and initial ram disk. The settings used here allow for a kernel of up to 8 MiB and an initial RAM disk of up to 12 MiB. These values are coded into the script "install_images.sh". If they need to be changed, the U-Boot environment variables will need updating as well. The following environment values are used in "ix2_env.sh":
    mem_kernel 0x1000000
        Offset in memory where kernel is loaded (16 MiB)
    mem_initrd 0x2000000
        Offset in memory where initial RAM disk is loaded (32 MiB)
    off_kernel 0x800
        Offset from start of raw hard disk where kernel starts in sectors (1 MiB)
    off_initrd 0x8800
        Offset from start of raw hard disk where initial RAM disk starts in sectors (17 MiB)
    sz_kernel 0x4000
        Number of sectors to load from disk for the kernel (8 MiB)
    sz_initrd 0x6000
        Number of sectors to load from disk for the initial RAM disk (12 MiB)
It is necessary to load the kernel and initial RAM disk into an area of RAM where they will not interfere with U-Boot or each other. U-Boot reserves the first 8MB for itself. The front portion of the loaded kernel image is executable ARM code. This is followed by a compressed kernel.
When U-Boot loads the compressed kernel and initial RAM disk, it validates the signature and checksums on these files before proceeding further. U-Boot then hands off execution to the ARM code at the front of the kernel. This is the point of no return for U-Boot and its memory area will be reused by the kernel.
The initial kernel ARM code decompresses the kernel payload that follows into low memory (starting at 0x8000 or 32 KiB). It is important that the uncompressed kernel is far away from this address because the uncompressed image is larger than the compressed one and they can crash into each other during decompression. Once the kernel is decompressed, it transfers control to address 0x8000 which decompresses the initial RAM disk and continues booting. Eventually, control is handed off to the program "/sbin/init" on the "real" root file system. Sometime during this process, the memory that was used to hold the compressed kernel and initial RAM disk is reclaimed.
The location of the initial RAM disk is less complicated. It just has to stay out of the way of the kernel. The value of "mem_kernel" and "mem_initrd" are passed to the kernel as command line arguments so it knows where these bundles have been placed in RAM.
Installing Raw Disk Images
This is the fastest way to get up and running if you have an IX2-dl or IX2-ng. There are four pre-made raw disk images as follows:
- ix2_dl_ide.img.xz
- IX2-dl IDE disk install
- ix2_dl_usb.img.xz
- IX2-dl USB stick install
- ix2_ng_ide.img.xz
- IX2-ng IDE disk install
- ix2_ng_usb.img.xz
- IX2-ng USB stick install
The IDE versions are for running on one of the IDE disks in your IX2 and the USB versions are for installation on a USB stick.
The following instructions use the "disk_install.sh" shell script that is in the "tools" package. You must have a Linux system to run this script. In addition, you must have the "parted" partition manager and "resize2fs" installed if you want the script to expand the image to use the full extent of the target device.
If you don't have Linux, find some software that runs on your O/S which can copy a raw disk image to a USB stick or hard drive. You probably won't be able to extend the file system to fill the entire device but for a USB stick, that doesn't matter. Once you have the stick running on your IX2, you will have Linux and can use the installation scripts in the /boot/tools directory. Just copy an IDE raw disk image from above to your running IX2 and run the /boot/tools/disk_install.sh script to prepare your IX2 IDE drive.
Step 1: Download the installation scripts:
tools-1.0.tar.bz2
Step 2: Unpack the scripts (this will create a boot/tools directory).
tar xvjf tools-1.0.tar.bz2Step 2: Download one of the images from the above list into the "boot/tools" directory.
Step 3: Run the installation script (substitute the name of your image file).
    cd tools
    IMAGE_FILE="disk.img.xz" sh disk_install.sh
The script will walk you through the rest of the process.
Step 4: Update your IX2 U-Boot environment (see next section).
Step 5: Install the USB stick or IDE drive in your IX2 and boot it up. If you started with a USB stick, you can repeat the installation process using an IDE raw disk that has been downloaded and transferred to your running IX2. Alternately, run the script "/boot/tools/install.sh" or one of its customized versions (i.e. ix2_*.sh). See below for details.
Running the "install.sh" Script
Once you have the Kirkwood kernel running on your IX2, you don't have to run Step 1 (downloading the root file system) and can just run the script "/boot/tools/install.sh".
Step 1: Download the root file system to a local directory:
kirkwood-5.18.7-ix2.tar.bz2
Step 2: Become root
The installation requires you to be a full root user. According to Bohdi's instructions, running sudo on each step can cause problems.
su -
Step 3: Extract the root file system
tar xjf kirkwood-5.18.7-ix2.tar.bz2
Step 4: Change to the tools directory
cd kirkwood-5.18.7-ix2/boot/tools
Step 5: Install the system on a USB stick or IDE drive.
If you have a USB SATA hard drive dock, you can put the target hard drive in the dock and use that as the target. Or, you can install the target drive on your computer if you have a second drive bay.
Alternately, you can create a USB stick installer and boot into that and then run the install script a second time to install the O/S onto an IX2 IDE drive.
When you are ready run the following command:
sh install.sh
Alternately, there are a small number of custom scripts that call "install.sh" after setting some environment variables so you don't have to make as many choices.
These include:
- ix2_dl_ide.sh
- IX2-dl IDE disk install
- ix2_dl_stick.sh
- IX2-dl USB stick install
- ix2_ng_ide.sh
- IX2-ng IDE disk install
- ix2_ng_stick.sh
- IX2-ng USB stick install
The installation script includes plenty of instructions and provides ample opportunities to not do most things. In order to support differences between Kirkwood devices, the install script has a customization phase which is run after files are copied to the target device. This system can be expanded by adding new scripts to the boot/tools/custom directory and modifying "install.sh" to include that option.
Modify Your IX2 U-Boot Environment
This step only has to be done one time. There is a U-Boot environment modification script in "/boot/tools/ix2_env.sh" which must be run from your stock IX2 operating system.
If you have access to a serial console to your IX2, you can change your U-Boot environment from there. Those changes are described in the comments at the top of the "ix2_env.sh" script.
List of Files in the Tools Directory
custom
This directory contains customizers that are run at the end of the
installation script.
functions
This directory contains common shell functions that are "sourced"
by the various scripts at startup.
clone.sh
This script uses "rsync" to copy the files from a target IX2 to
the directory above "boot/tools" (a.k.a. the Kirkwood root file
system).
install.sh
This is the main installation script. It calls "make_images.sh" and
"install_images.sh" to handle those parts of the installation.
make_images.sh
This script generates the kernel and initial RAM disk using "mkimage".
For devices with older U-Boot versions, a DTS file is appended to
the kernel.
install_images.sh
This script installs the kernel and initial RAM disk on a target device.
This should only be run for devices that have an older version
of U-Boot that does not support GUID partition tables. It installs
the kernel and initial RAM disk in an unallocated portion of the
disk before the first partition.
ix2_dl_ide.sh
Sets environment variables appropriate for creating an IX2-dl IDE
disk and calls "install.sh".
ix2_dl_stick.sh
Sets environment variables appropriate for creating an IX2-dl USB
stick and calls "install.sh".
ix2_ng_ide.sh
Sets environment variables appropriate for creating an IX2-ng IDE
disk and calls "install.sh".
ix2_ng_stick.sh
Sets environment variables appropriate for creating an IX2-ng USB
stick and calls "install.sh".
install_tools.sh
Copies the files in the current directory (which should
be boot/tools) to the /boot/tools directory of a
running IX2 device with a hostname of "ix2". This is useful
when you edit scripts on your development machine and want
to send them to your IX2.
disk_raw.sh
Creates a 2 GiB loopback device that can then be used to install
a raw image. Follow this immediately with a call to "install.sh".
disk_pack.sh
Call this script after creating an image on a loopback device to
disassociate the loopback device from the image file and then
pack the file with the xz compressor. The resulting raw disk image
can be used to create bootable disks and USB sticks. See next script.
disk_install.sh
Call this script to install a compressed or uncompressed raw disk
image to a target device. It will optionally expand the image
to fill the entire device.
unloop.sh
This script will disassociate a raw image file from any loopback
device it is associated with. Use this if you will not be calling
"disk_pack.sh" to avoid having dangling loopback devices.
ix2_images.sh
This script will create the four IX2 raw disk image files
described above. It provides a template for creating a
set of images in a mostly automated fashion.
LEDs, Sensors and Fan Control
The following additions for the IX2 can be found in "/etc/rc.ix2". This file is run at the bottom of "/etc/rc.local".
- Turn off white and turn on red led to show system has booted.
- Enable blue led for IDE disk activity.
- Configure automatic fan control.
LEDs
The IX2 LEDs can be controlled through the "sysfs" file system in the following directory:
/sys/class/ledsEach LED has a separate directory under which the following entries are useful:
- brightness
- 0=off, 1=on
- trigger
- Running "cat trigger" shows all available triggers with the current trigger setting in square brackets. To change a trigger, "echo" the trigger name into "trigger".
Sensors
The Kirkwood kernel exposes four temperature sensors via the "sysfs" file system. All temperatures are expressed in degrees Celsius times 1000 (i.e. 40000 = 40 degrees C).
There is a Debian package (lm-sensors) which has already been installed in the IX2 prepackaged system which includes the "sensors" program. This program displays the ouput from the various temperature sensors and fans (there is only one fan in the IX2 -- fan1).
The CPU temperature is associated with the "kirkwood_thermal-virtual-0" device which can be read as follows:
cat /sys/devices/virtual/thermal/thermal_zone0/tempThe other three temperature sensors are related to the ADT7473 chip that controls the chasis fan at the back of the IX2. The ADT7475 device driver (which handles the 7473 chip) exposes all ADT7473 related inputs and controls in the following directory:
/sys/devices/platform/ocp@f1000000/f1011000.i2c/i2c-0/0-002e/hwmon/hwmon1The three temperature sensors can be read with the following command (replace X with 1, 2 or 3):
cat tempX_inputThe ADT7475 device driver is found in the following kernel source code file: "drivers/hwmon/adt7475.c"
Fan Control
The ADT7473 has two modes of operation: manual and automatic. When the system boots up, the controller is in "manual" mode and the fan runs at a predefined, low speed. There is only one fan in the IX2 and it is controlled via the "pwm1*" sysfs files. In manual mode, the file "pwm1" controls the speed of the fan. These files are found in the following directory:
/sys/devices/platform/ocp@f1000000/f1011000.i2c/i2c-0/0-002e/hwmon/hwmon1Use the "echo" command to set this value from 0 (lowest) to 255 (max). You can't turn the fan completely off, so a value of 0 returns the fan to its default boot-up speed (which is pretty slow). The included "/etc/rc.ix2" file enables automatic fan control (see below) but you can comment that out and change the value that is stored in pwm1 to a fixed value of your choice.
One way to alter fan speed with temperature is with the Debian package "fancontrol". This package includes the bash script "fancontrol" and a configuration utility called "pwmconfig" which creates the configuration file "/etc/fancontrol" which is used by the "fancontrol" bash script when is starts running. This script runs as a service at startup, checks the temperature sensor of your choice every ten seconds and sets the fan speed accordingly.
The "fancontrol" package is not installed by default because the ADT7473 supports automatic fan control. However, the "fancontrol" program can use the CPU temperature as an input whereas the ADT7473 only has access to its three temperature sensors.
The ADT7475 device driver supports the following "control" values in "pwm1_enable":
Value Meaning 0 Run fan at full speed 1 Manual mode 2 Automatic mode (must first select channel)
The ADT7473 data sheet data is extremely detailed but you can jump to page 34 "Automatic Fan Control Mux Options" to see how automatic mode is programmed. The following table shows the correspondence between the kernel sensor names and the ADT names.
Kernel Name ADT7473 Name temp1 Remote 1 temp2 Local temp3 Remote 2
In automatic mode, the IX2 ADT7473 chip will monitor one or more temperature inputs and adjust the fan speed based on the following properties (the sysfs names are used here):
- pwm1_auto_point1_pwm is the lowest fan speed.
- pwm1_auto_point2_pwm is the highest fan speed.
- temp1_auto_point1_temp is the lowest autopoint temperature for sensor 1.
- temp1_auto_point2_temp is the highest autopoint temperature for sensor 1.
- temp2_auto_point1_temp is the lowest autopoint temperature for sensor 2.
- temp2_auto_point2_temp is the highest autopoint temperature for sensor 2.
- temp3_auto_point1_temp is the lowest autopoint temperature for sensor 3.
- temp3_auto_point2_temp is the highest autopoint temperature for sensor 3.
When the temperature is below tempX_auto_point1_temp, the fan will run at pwm1_auto_point1_pwm. When the temperature is above tempX_auto_point2_temp, the fan will run at pwm1_auto_point2_pwm. If the temperature is above "tempX_crit" (100 degrees C), the fan will be run at maximum speed (255).
For temperatures between tempX_auto_point1_temp and tempX_auto_point2_temp, the fan power is set proportionally between pwm1_auto_point1_pwm and pwm1_auto_point2_pwm. You don't have to set tempX_auto_point2_temp because it will automatically be set 32 degrees Celsius higher than temp1_auto_point1_temp by the kernel driver.
The ADT7473 can be programmed to check one, two or three temperature sensors when determining the current fan speed. When more than one sensor is selected, the highest calculated fan speed is used. The configuration in "/etc/rc.ix2" uses all three sensors because, why not? Although temp1 always seems to give the highest temperature reading, that may change with a different hard disk configuration or work load.
To use automatic mode, you first have to tell the device driver which temperature "channel" to use. This is done with the "pwm1_auto_channels_temp" file. The following table maps the kernel values with the ADT7473 data sheet values (page 34) for bits <7:5> (BHVR) of register 0x5C:
Kernel Channel ADT7473 Value Meaning 1 0 Remote 1 2 1 Local 4 2 Remote 2 6 5 Local + Remote 2 7 6 All three sensors
In the last two cases where two or more temperature sensors are used as input, the value that produces the highest fan speed is used to control the fan. To select all three sensors, the following command is used:
echo "7" > pwm1_auto_channels_tempOnce the channel has been set, the ADT7473 is put into automatic mode as follows:
echo "2" > pwm1_enableHow to Build the Kernel
If you are so inclined, you can build your own kernel on your Kirkwood device once you have it running a Bohdi or IX2 kernel. On the IX2, the build takes about 23 hours. Alternately, you have to perform a cross-compile of the kernel on your regular development box. The steps for a native kernel compile are as follows:
1) Download the kernel from kernel.org.

2) Unpack it with "unxz".

3) Extract it with "tar".

4) cd linux-x.x.x

5) patch -p1 -l -b <../*.patch

This will patch the kernel files. The flags used are:

    -p1=ignore one path element
    -l=ignore whitespace
    -b=make backup files to .orig

After running the patch you can find the original version of modified and new files like so:

    find . -name '*.orig'

6) Install required Debian packages to build your kernel (only do this once):

apt install build-essential libncurses-dev bison flex libssl-dev libelf-dev bc

7) cp /boot/config-5.18.7-kirkwood-tld-1 .config

This is the kernel configuration file which controls what gets compiled
and whether it is built into the kernel or built as a loadable module.

8) Run "make menuconfig" if you want to change the config.

Note that running this after you have built your kernel may cause "make"
to remake everything.

9) make

This creates an "image" and a "zImage".

10) make modules_install

Copies modules to /lib/modules/KERNEL_VERSION

11) make zinstall

Creates initrd and installs everything (except dts files) into /boot

12) make dtbs_install

Copies dts files to /boot/dtbs

Then:

    cd /boot/dts
    rm -f *.dtb
    mv ../dtbs/5.18.7-kirkwood-tld-1/*.dtb .
    chmod 644 *.dtb

13) make headers_install INSTALL_HDR_PATH=/usr/src/linux-headers-5.18.7-kirkwood-tld-1

Copies headers to /usr/src/...

14) cd /boot/tools

15) Run "make_images.sh" to create the final uImage file (the kernel) and uInitrd (initial RAM disk).

16) If you have an old U-Boot version which doesn't support GPT devices, run "install_images.sh".
If you want to create your own patch file:
1) Unpack the original linux kernel files.

2) Rename that linux directory to "a".

3) Create a directory "b".

4) Copy all of the files in your compiled kernel to "b".

5) cd b

6) make distclean

This will remove everything that was created during the compile
and is why you copy your custom kernel to the "b" directory.

At this point you will have an "a" directory with the before
version of the kernel and a "b" directory with the after version.
Note that both "a" and "b" should be the top-level directory where
the kernel Makefile and .config files are located.

5) diff -Naur a b > my_changes.patch

This will create a patch file with any differences between the
original kernel and your custom version.
IX2 Documents, Specifications and Datasheets
The following are some documents related to the IX2 that were found on the internet. This includes original specifications and IX2 software documentation, as well as datasheets for some of the chips used on this device.
- Iomega IX2 Product Sheet
- Lenovo IX2 Product Sheet
- Lenovo IX2 User Guide
- 88F6281 Integrated Controller Hardware Specifications
- Marvell 88F6282 SoC Spec Sheet
- ADT7473 Remote Thermal Monitor and Fan Control
- MX25L8008E CMOS Serial Flash Memory
Maximum Disk Size
According to the IX2 spec sheets, this device can support a maximum of two 3TB drives for a total of 6TB of disk space. However, the Marvell 88F6281 spec sheet (the IX2 uses the 88F6282) indicates that the disk controller supports SATA 2 and 48 bit addresses. So, it's possible the 3TB limitation was due to the original software. I have not tried anything larger than 3TB drives. If anyone has successfully used larger drives in the IX2, please let me know and I will update this page.